Building a Kegerator
I brew beer at home. My roommates and I decided to take it to the next level and build a kegerator (keg refrigerator) so we can have cold draft beer dispensed from a tap in our kitchen.
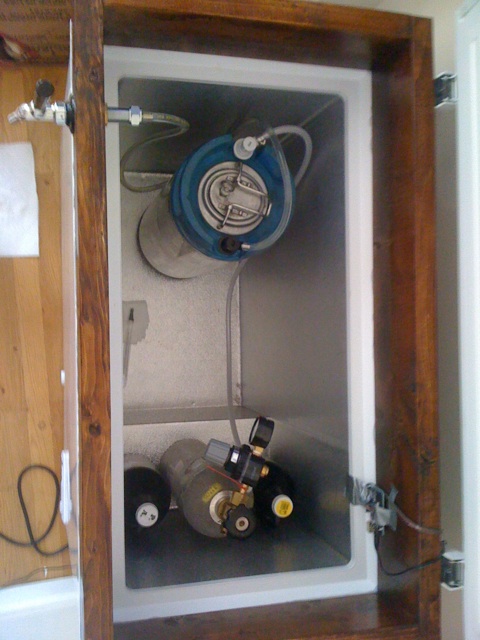
There are lots of parts. To dispense draft beer, at a minimum you need: kegs (pressurized containers that store and dispense beer), a CO2 tank (to pressurize the kegs), tubing and disconnects for gas and liquid, and some kind of faucet.
To keep it cold, you need some kind of fridge. We are using a [GE chest freezer] 5, and we’re using a temperature controller to prevent it from actually freezing the beer.
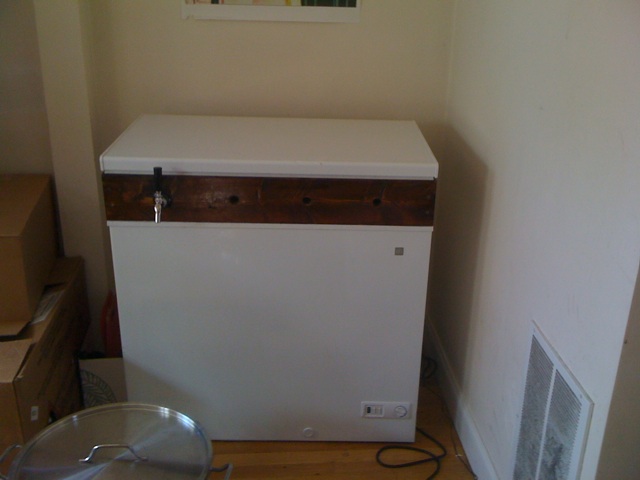
To avoid drilling big holes in the freezer itself, we used the popular method of [building a wooden collar] 2. You remove the lid, put the collar on the edge of the freezer, and then reattach the lid to the collar. You can easily drill holes in the collar to allow taps and cables through. And if you don’t want the kegerator anymore, the freezer can return to normal freezer status.
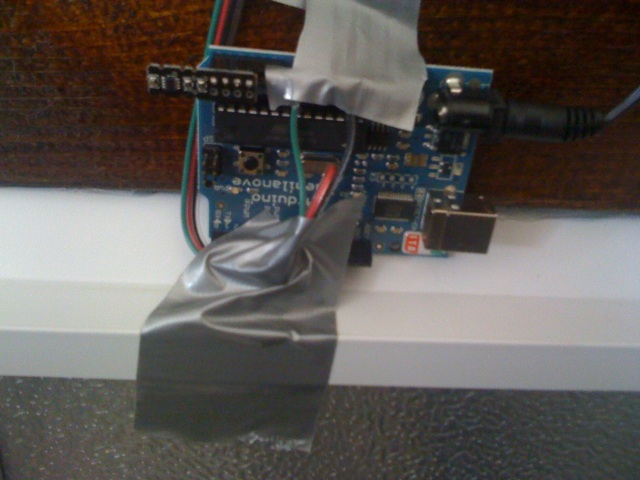
The temperature controller is also homemade. I picked up an [Arduino microcontroller] 3, [temperature sensor for Arduino] 4, relay for wall current, and a few other electronic parts, so my Arduino can turn a plug-in device on or off.
| Item | Source | Cost |
|---|---|---|
| Refrigerator assembly | ||
| GE Chest Freezer 7.0 ft3 | Home Depot - we got their floor model for cheaper | 150 |
| Collar lumber, screws, stain, & caulk | Home Depot | 15 |
| 1st tap assembly | ||
| Keg kit (1 Cornelius keg, CO2 tank, regulator, fittings) | Rebel Brewer | 180 |
| Fill CO2 tank (it ships empty) | Modern Brewer (local homebrew shop) | 25 |
| 1st Perlick faucet | Modern Brewer | 40 |
| 1st shank, beer nut, and washer | Modern Brewer | 20 |
| 2nd tap | ||
| 2nd keg | Modern Brewer | 40 |
| 2nd Perlick faucet | Modern Brewer | 40 |
| 2nd shank, beer nut, and washer | Modern Brewer | 20 |
| Gas 5-way manifold | Modern Brewer | 120 |
| Gas line 2-way splitter and valve (no longer used) | Modern Brewer | 40 |
| 2nd beer+gas line, disconnects, & misc supplies | Modern Brewer | 20 |
| Last 2 taps | ||
| 2 Perlick Faucets | RiteBrew | 50 |
| Homemade temperature controller | ||
| Arduino Duemilanove | Modern Device | 30 |
| Arduino Temp Sensor | Modern Device | 10 |
| Relay & misc parts | Digi-Key | 20 |
| Total | 820 | |
For the collar, we followed [this guy’s instructions] 2. We bought 10 feet of 2x6 pine from Home Depot, measured it against our freezer, and cut it with a table saw. We screwed it together with 2.5" wood screws. You can see the screws on the front on one of the pictures above. If I had thought ahead more, I would’ve made the short sides longer and screwed it in from the side instead.
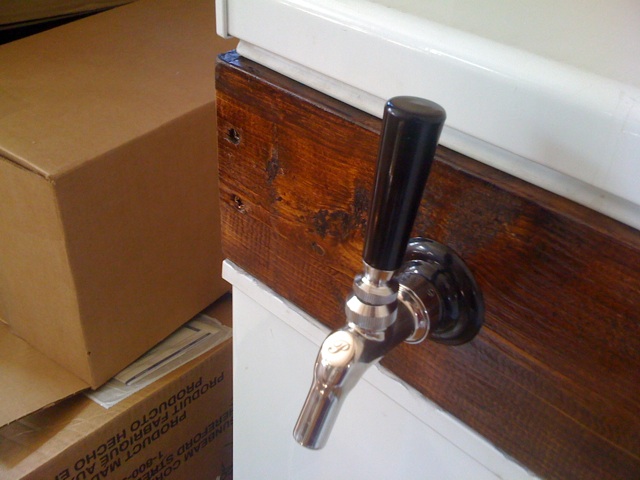
After putting the collar together and sanding it, we applied pre-stain to the soft pine, let it dry for 2 hours, applied stain, and let it dry for 24 hours. Then we went to the [local homebrew shop] 10 to pick up the faucet and shank. They sold us the parts and loaned us the correct hole saw for cutting the faucet holes. So we cut the holes and stained it once more.
Then we stuck it onto the freezer by laying down a line of caulk and putting the wood on. Left it for 24 hours with our brewpot full of water to weigh it down. We should have used new silicone caulk, but we used 10-year-old caulk which didn’t set properly. Nonetheless, the collar doesn’t budge, so we’re leaving it that way.
Last step is the temperature controller. I don’t know too much about electronics, but I know enough to be dangerous. In this case, I was attempting a project I’d never done before: switching mains voltage (120V powering the freezer) with a microcontroller.
The mains voltage must be isolated from the arduino using a relay, which lets us have separate switching circuit and power circuit. My original plan was to use a 5V relay, with the coil across the Arduino’s digital pin and ground.
However, I read about it enough to determine that that’s a bad idea: the relay is an inductive load, which produces “back emf” when it is turned off. Back emf is a voltage spike which can blow transistors if you’re not careful. The way you deal with back emf is with a [flyback diode] 12. I also used a transistor on the Arduino’s output pin, because I wasn’t sure how much current the relay would draw through the Arduino. In all, I ended up using the circuit given [here] 11. Soldered it together without a breadboard. It’s been a while since I soldered anything, but I managed to get the device working on the first shot – no shorts, no blown circuit breakers, or anything.
Initially I had the temperature sensor about halfway to the bottom of the fridge, and it was reading very high temperatures. The fridge has a very strong temperature gradient; it can be below freezing at the bottom when it’s still 50F at the top. (This is probably due to the poor insulation at the top due to the wood and holes through the wood.)
So I made an extension cable for the temperature sensor. Now the sensor itself is nearly at the bottom, and the Arduino and the rest of the kit can sit outside the freezer. After only a few soldering problems I had it working. Of course, while trying to install the extension cable, I snapped one of the pins off my transistor, so I had to redo the soldering for that circuit.
For the party this weekend, I wanted to label the taps. I discovered that whiteboard marker works beautifully and erases well from the front of the fridge.
And that’s a kegerator! I’ll continue updating the price sheet above, and adding descriptions of anything interesting we come across as we fill out the four taps. And if you are near Boston, feel free to stop by, have some beer and talk about the project.